Showing posts with label The Gown. Show all posts

Wednesday, November 25, 2015

Wedding Day - Getting Ready

(And then I make you wait three months...) 

Wedding day!  April 11 had finally arrived.  I had much help getting ready.  My aunt Diane styled my hair while I ate the eggs that my cousin Erin had made for my breakfast while my mom finished sewing the lace to my veil.  I got into my corset, threw a skirt and top on over it, and drove to the church with my tiara in place.  My bridesmaids and I set up camp in the room set aside for us for the morning, and they helped each other with hair and makeup while my aunt Donna (my personal attendant) helped me get dressed.  Stephen, our excellent photographer, arrived a little later and took fun getting-ready pictures.  Unless otherwise noted, all photos in this post are courtesy of Modest Monkey Photography. 


My sister (and Maid of Honor) Gretchen decorated these bags, and we filled them (and one for the groomsmen) with various emergency items: 

Bonus point is you can spot the most massively useful thing in this shot
All of my "somethings"
Something Old - the lace edging on my handkerchief was scraps of leftover lace tatted by my aunt and grandma for my mom's wedding dress in 1980. 

Something New - the garter knitted for me by my aunt Diane

Something Borrowed - the pearl necklace belonged to my grandma, and both my mom and sister Elise (Matron of Honor) wore it in their weddings as well

Something Blue - silk ribbon shoe clips

The pearl earrings were a 30th birthday gift from my parents, chosen to match the borrowed necklace.  I also had a silver sixpence that Gretchen brought back from England for me to wear in my shoe. 

Shoes, stockings, and shoe clip hardware are all from American Duchess.

 Donna helping me get dressed: 


Diane affixing my veil for me:


Finishing my makeup:


Bridesmaids (Laura and Melissa) helping each other get ready:  

Gretchen's photo
 Stephen doing his thing: 

Gretchen's photo

My brother Aaron (one of the groomsmen) and me, chillin':


Gretchen's photo
 Mom being sweet:


And before we knew it, it was time for the ceremony! 

Wednesday, August 26, 2015

Final Touches

At some point in the construction process I added a hidden pocket in the right side seam of the skirt.  This same seam is where the back of the overskirt ended, so I just tucked the raw edge inside while I had the seam open, and stitched it shut again with everything neatly sandwiched between.  This was all covered by the side drape, which I simply slid my hand underneath from behind in order to access the pocket discreetly.  I used this pocket to hold my handkerchief, vows, and cell phone (on silent, of course) during the ceremony.

Right side with the drape hiding everything
Pull it aside - hidden pocket!  
I put it in slightly lower than I meant to, but it was too much work to move it.  
Just a few days before the wedding, my mom helped me finish the train.  We cut a semi-circular shaped piece of heavy Pellon interfacing and sandwiched it between the layers of the pleated back of the train and the twill tape waistband.  Then Mom stitched it down with both horizontal and vertical lines to hold it in place and give the back of the train the extra support it needed.


To attach the train, Elise sewed on a skirt hook at the front of the waistband, and when it was on I simply covered the twill tape with the front drape.


The back ends went under the back of the train and fastened together with skirt hooks again.


And finally the dress was done!  Now for the good part - wedding day pics!  :D

Sunday, July 26, 2015

Final Stages

I'm terribly delinquent on this update.  I have many pictures to post from the wedding day itself, but I want to get all of the dress-making posts done first!  This should be the penultimate one.  Progress!

As the wedding drew nearer, I stepped up my pace on the gown but stopped taking the time for in-progress photos.  All of the photos in this post were taken after the wedding.  


The hem was the next big step.  I pressed the edge of both layers - fashion fabric and lining - where Stefanie had pinned it, then removed the pins.  I was using a hemming technique that I learned at the Costume Design Center - we use it for hemming men's coats.  I love this technique because it hems the outer fabric and lining in one, with the seam allowance safely encased inside.  It's also very simple.  I plan to do a step-by-step tutorial with photos after this post.  

I actually messed up the first time I sewed the hem, because I turned the skirt inside out and then pinned it together.  When I turned it right side out again, I ended up with a Möbius strip mess.  :p  So I unpicked the whole thing, matched up all the seams and pinned them together before turning it inside out again through the small opening I had left at the side when I sewed the neckline edges together.  I re-sewed the whole thing, turned it back right side out and this time it was perfect.  :)  I turned in the edges of the side opening and stitched them together by hand.  Then came the complicated task of figuring out the closures on this side.  

The following photos show how I get into the dress (with instructions in parentheses), and will help explain how I added all of the fastenings:  

(First I button up the right side)
For these photos, I put it on over my corset (which the lovely Stefanie bound for me!) and yoga pants, for modesty.


(Then wrap the front bodice over to the left side)  
Ok kids, this is where it gets complicated.
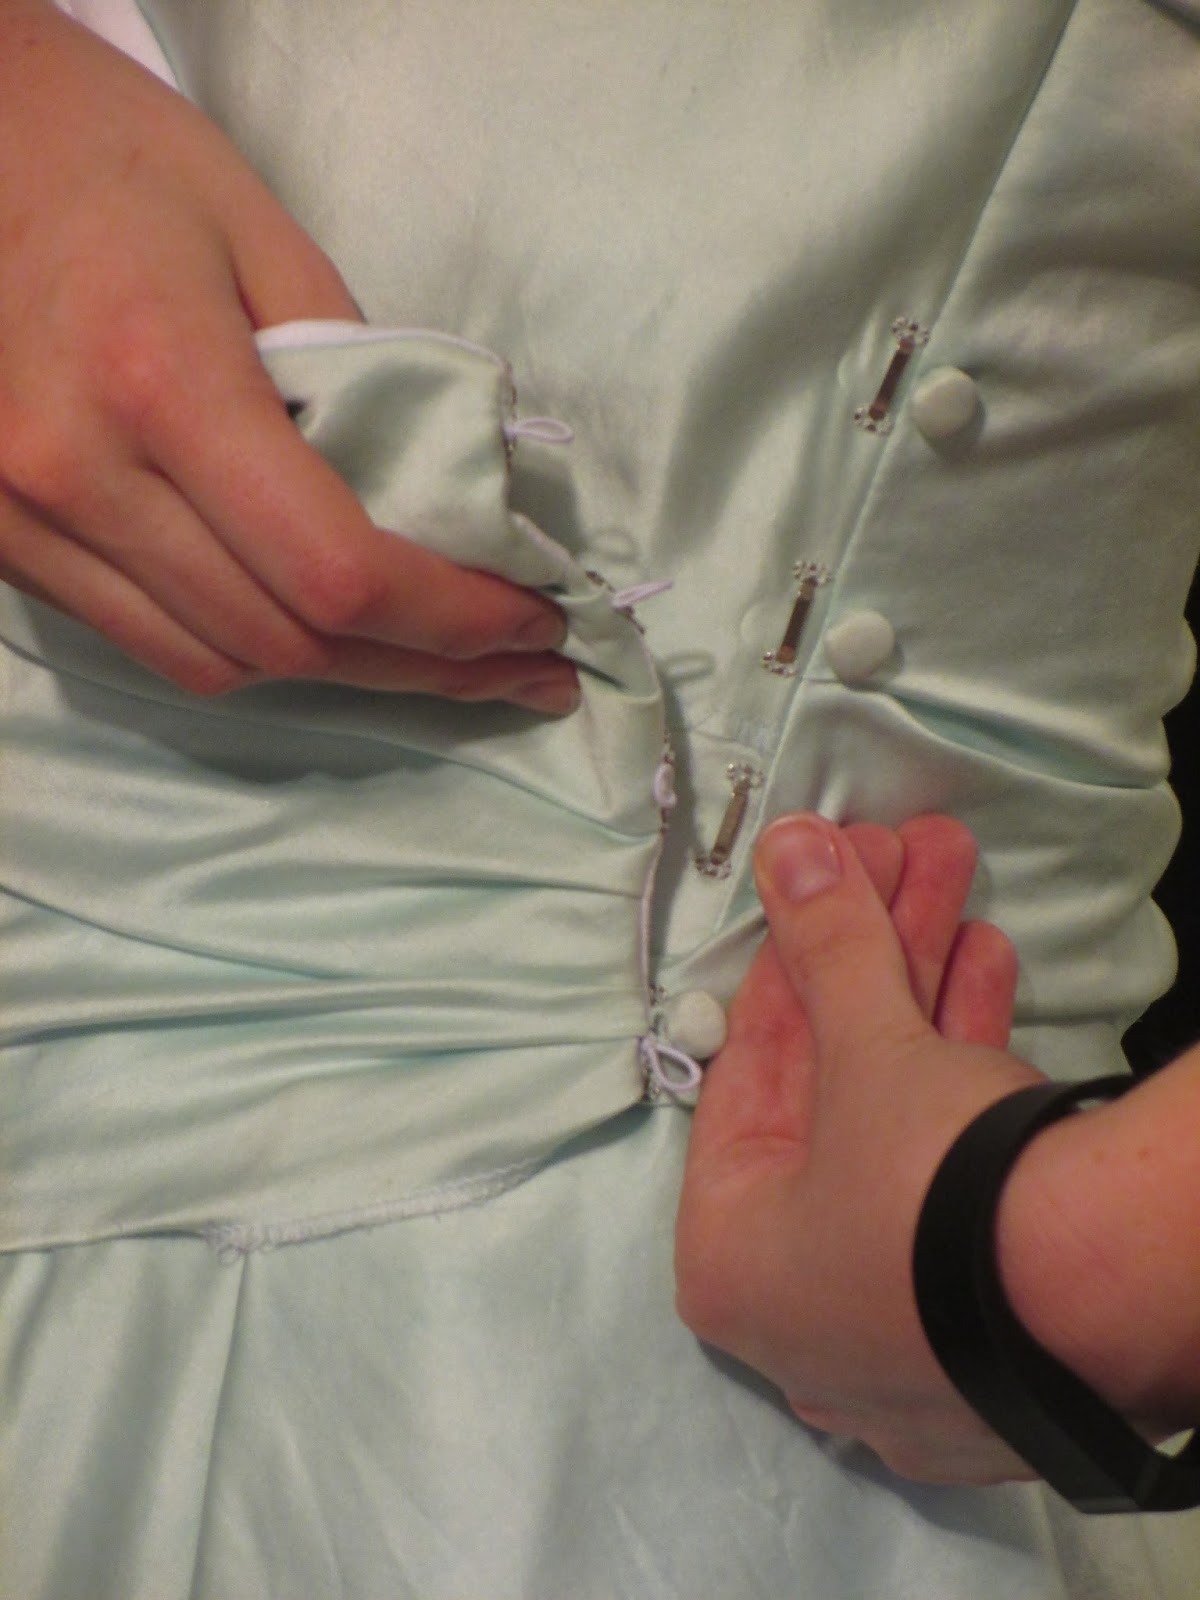
I had left the box pleat in the overskirt over the left side seam unstitched so that I would be able to get in and out of the dress.  I put the dress on, pinned the pleat in place, and marked where the folded edges would meet. I added snaps to hold the pleats closed, but ended up replacing one of them later with a skirt hook for a tighter fit.  Though I actually never removed that snap.  :p 

(First snap the back half of the box pleat closed)


(There's a hidden snap here pulling the inside of the front half of the pleat to the center.)


(Finally hook the front half of the pleat over to the bar, hidden beneath the edge of the bodice when closed.)

I also used skirt hooks to fasten the left side of the wrap front to the left side seam of the bodice.

This was a little tricky, as I had to also account for the folded-under lower edge of the back bodice piece, so it became somewhat like a puzzle that had to be assembled in the correct order.


I needed this little piece at the bottom to attach to both the skirt and the front bodice, then bring the wrap front section over and attach on top of it.  I ended up using two smaller hooks and two thread loops - one on the skirt and one on the bodice - to accomplish this.  Then a skirt hook on the wrap section covered it.

(Hook small hooks to thread loops)


(Hook wrap front to side seam)


In order to disguise the skirt hooks and to match up with the right side of the bodice, I added four more covered buttons just on the other side of the left side seam.  The very last step on the dress was actually done by my sister (also my Matron of Honor) Elise, who made tiny elastic loops and attached them to the edge of the wrap front hidden beneath the skirt hooks they were there to help cover.

(Pull elastic loops over buttons.)  


With the elastic loops over the buttons, the side closure looks very smooth and elegant - at least I think so.  :p


I'm going slightly out of chronological order now, because I only have photos of the completed gown so I had to explain the elastic loops even though they came after the skirt ruffle.


I had debated adding this detail and leaving it plain at the front of the skirt under the overskirt, but I think the ruffle really adds a little something that was missing.  I hemmed my triangular piece by hand before attaching it, which made the sewing a lot easier.  Then I didn't have to guess how the finished hems would line up!  I left the top edge as it was, since it was the selvage and I didn't want to bother with hemming it and just creating bulk at the top edge of the ruffle.  I measured the length of the top of the ruffle and the space I wanted it to fill, did a little math, and came up with the spaced box pleats (I have a thing for box pleats - can you tell?) that brought it to the right length to fill the space.  Then I pinned it in place, matching up the two hems at every pleat juncture, and stitched it on by hand.


And with that, the dress was done!  Finally!  :D


All that remained was figuring out the train, and I waited until my parents arrived from Iowa on the Monday before the wedding so that my mom could help me with it.  She was able to make observations of the train with me wearing it, which I couldn't do very well on my own.  We ended up using Stefanie's suggestion about supporting the waistband in the back with some nice thick Pellon interfacing, which worked beautifully.  I cut a crescent-shaped piece that we sandwiched in between the waistband and the pleated layers of silk, and my mom pinned it in place when I tried it on.  We decided to sew through all the layers on the machine with vertical rows of stitching to reinforce the pleats and keep them firmly secured to the interfacing and waistband.  It worked beautifully, and Elise also attached the skirt hook to the waistband for me while I worked on my veil - another story for another post!  

Wednesday, April 29, 2015

Finishing

3/11/15 - Just one month to go before my wedding, I was in the finishing stages of my gown.  I had stitched the lining pieces back together, and I added boning to the bodice seams.  I used spiral steel bones left over from making my corset.  

Before I could attach the lining to the dress itself, I needed to stitch the bottom edge of the back drape to the back bodice.  The top edge was basted to the foundation along the top neckline.  I pinned the bottom edge where I wanted it, then removed the basting and flipped the top down out of the way.  I then stitched the bottom edge to the foundation on the machine, and pulled the top edge back up and basted it to the neck edge again.  Next I attached the lining to the dress along the full neck edge, just below the basting line.  (I re-wrote this paragraph several times, so I really hope it makes sense!)  

I understitched the seam allowance to the lining, clipped curves, and turned the dress and lining right side out.  As soon as I did I realized I had problems.  The bottom edge of the back drape was pulling funny and creating unslightly wrinkles.  


So I was forced to unpick the stitching on the bottom edge and re-pin it where it naturally wanted to fall.  I then had to re-stitch it by hand, which was somewhat of a challenge.


But the lines were much smoother now!  So it was worth all the aggravation, I guess.  :p

I also turned up the lower edge of the bodice draping and pinned it down to the skirt (after serging this edge to make it a little neater) and handstitched it, as well.


3/14/15 - As I was working on some of this hand-sewing, I was listening to the rain outside and hoping that it would not rain on my wedding day.  We were not having an outdoor wedding, but I did have my heart set on taking pictures outside at Colonial Williamsburg.  So to ease my mind, I took a break from sewing and took a swatch of leftover silk outside and held it out in the rain for a few seconds, so I could observe the effect of rain water on my dress fabric.


I let the rainwater dry, and came back to it a few minutes later.


The fabric did not seem to me to be damaged from the rain.  There was no running of the dye, which was the thing I was most worried about.  There was some wrinkling, but much of that was there before the rain.  My fears allayed, I went back to my sewing.

3/25/15 - It was time to mark the hem!  I had just assembled all of my undergarments (more on that later) and my friend Stefanie agreed to help me pin it.  We went to her house after work, and I got all dressed in my corset, petticoat, shoes, and gown.  As a former bridal consultant/seamstress, I know very well how important all of these pieces are to the overall fit and length.  Stefanie pinned the hem for me, and I practiced walking with it pinned to test the length.  I walked on both the hardwood floor and the large floor rug, to make sure that it wouldn't be too long on a carpeted surface.  I also practiced walking up and down the stairs, just in case I should have a need to use stairs on my wedding day.

We also took some pictures of me in the dress, because I couldn't take pictures of myself in the dress at home.


Sometime between March 11 and March 25 I made and attached covered buttons to the right side of the gown, replacing the bright red plastic buttons I had used as placeholders.  I bought my button molds from Burnley & Trowbridge.  I believe the ones I got were the 3/8" size.


I also tried on the train, which I had done a bit of work on since February 16.  Basically I had added a 1" wide twill tape waistband that would fasten in the front, and I had made the decision to keep the front drape as a separate piece to be placed over the waistband to hide it.


I was still having problems with the train gapping in the back, however.  Stefanie suggested using some really heavy interfacing to add some support to the waistband in the back.  I did end up implementing her suggestion, but it got put on the back burner until after the dress itself was finished.